Lighting
There are two light sources, both coming from outside through the
window. One of them is a strong sun light, the other is a weaker light
that represents light coming from the outside environment. I set the
angle and intensity of these light sources to make the scene have the
look of a morning at 9am. The window blinds prevents much of the light
to come in, thus a large part of the scene is lit by indirect light,
giving it a soft, smoothing feel.
Materials
I used Blinn-Phong shading model with a Fresnel reflection term
for all objects here. I tried normalizing
the diffuse term but did not like what I saw. The decision to
not include any reflective/refractive objects was deliberate. I wanted
to aim for a "diffuse" look with this scene, and also adding reflective
surfaces would increase the level of noise in the rendering. It was hard
to freely modify the materials for objects in this scene, since some of
them share the same material (e.g., the table top and the shelf both use
the same "wood" texture). Even worse, after I cleaned up the scene with
MeshLab, objects that share the same material got merged together in the
.obj file, making the job of assigning each object in the group a
different material impossible.
Rendering
I used photon mapping with final gathering to render this scene. There
are a couple of difficulties with the rendering. The area light outside
the window is difficult to sample, so I stored the first bounce in the
photon map and did not sample the light directly for the Monte Carlo
bounce (the light is still sampled directly for the first primary-ray
bounce though). The corners and creases of the scene make it hard for
photons to get to, and those areas have the most noise in the final
rendering.
Optimization
I separated the direct and indirect lighting so that I didn't have to
use 32 (Anti-Aliasing) x 512 (Monte Carlo) samples for each pixel. I
also played a bit with pre-filtering the photon map but did not get very
far with it. Pre-filtering didn't seem to help in my case (I used a hash
grid instead of a kd-tree to store the photon map, so a nearest-point
query is not quite cheaper than an intersecting sphere query, and is
awkward to do).
Parameters
and timing
Number of photons emitted: 3 million
Number of AA sub-pixels: 32 per pixel
Number of MC samples in final gathering: 384 for each sub-pixel, and 8
sub-pixels per pixel
Number of MC samples for the area light: 128 per sub-pixel, 32
sub-pixels per pixel
Reconstruction filter: a Gaussian filter (I found that
Mitchell-Netravali tends to exaggerate the errors)
Time taken for building photon map: about two minutes
Time taken for rendering: about 4 hours
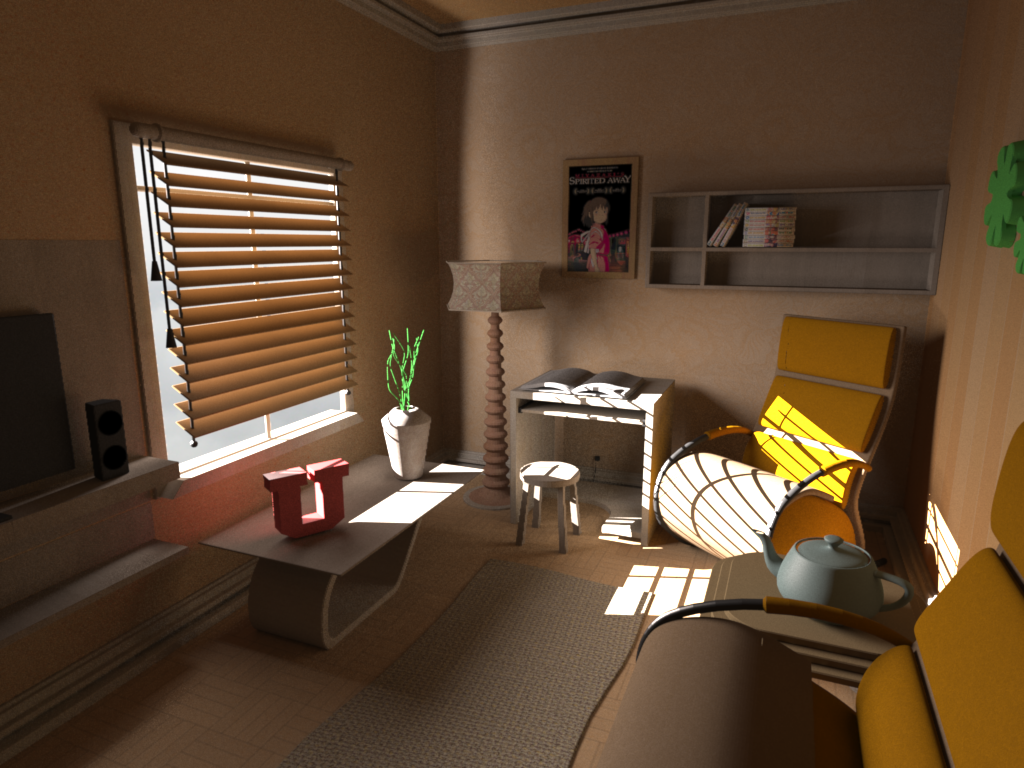
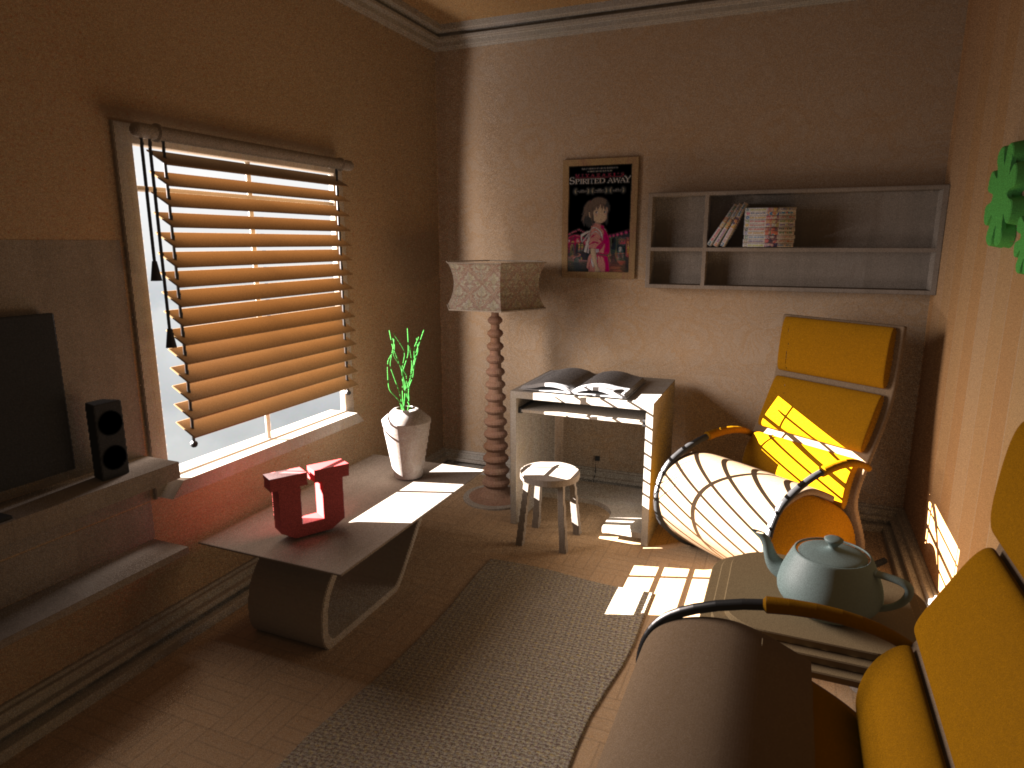
On
the left is the actual image that was used for the competition. After
the competition I discovered a bug in the photon gathering code that
ignores legitimate photons and makes certain areas darker. I have
fixed it and re-rendered the scene (this time in only 1.8 hours),
which is the image on the right. You can notice subtle differences at
places such as the parts under the U block, behind the chair on the
right, and under the study table. In a diffuse scene
like this the bug will not be very apparent, but it will be for scenes
with caustics.
|
|